Hey There, In this article, we will see the simplest way on how to create a MultiBoot USB Flash Drive in the easiest way possible.
Creating a bootable USB drive comes in handy when we had to reinstall our operating system, in case of system failures. It's effortless to put .iso files on portable Pendrives.
There are many operating systems available in the market, either free or paid. Life is a lot easier when we have a single storage media, which contains many .iso files.
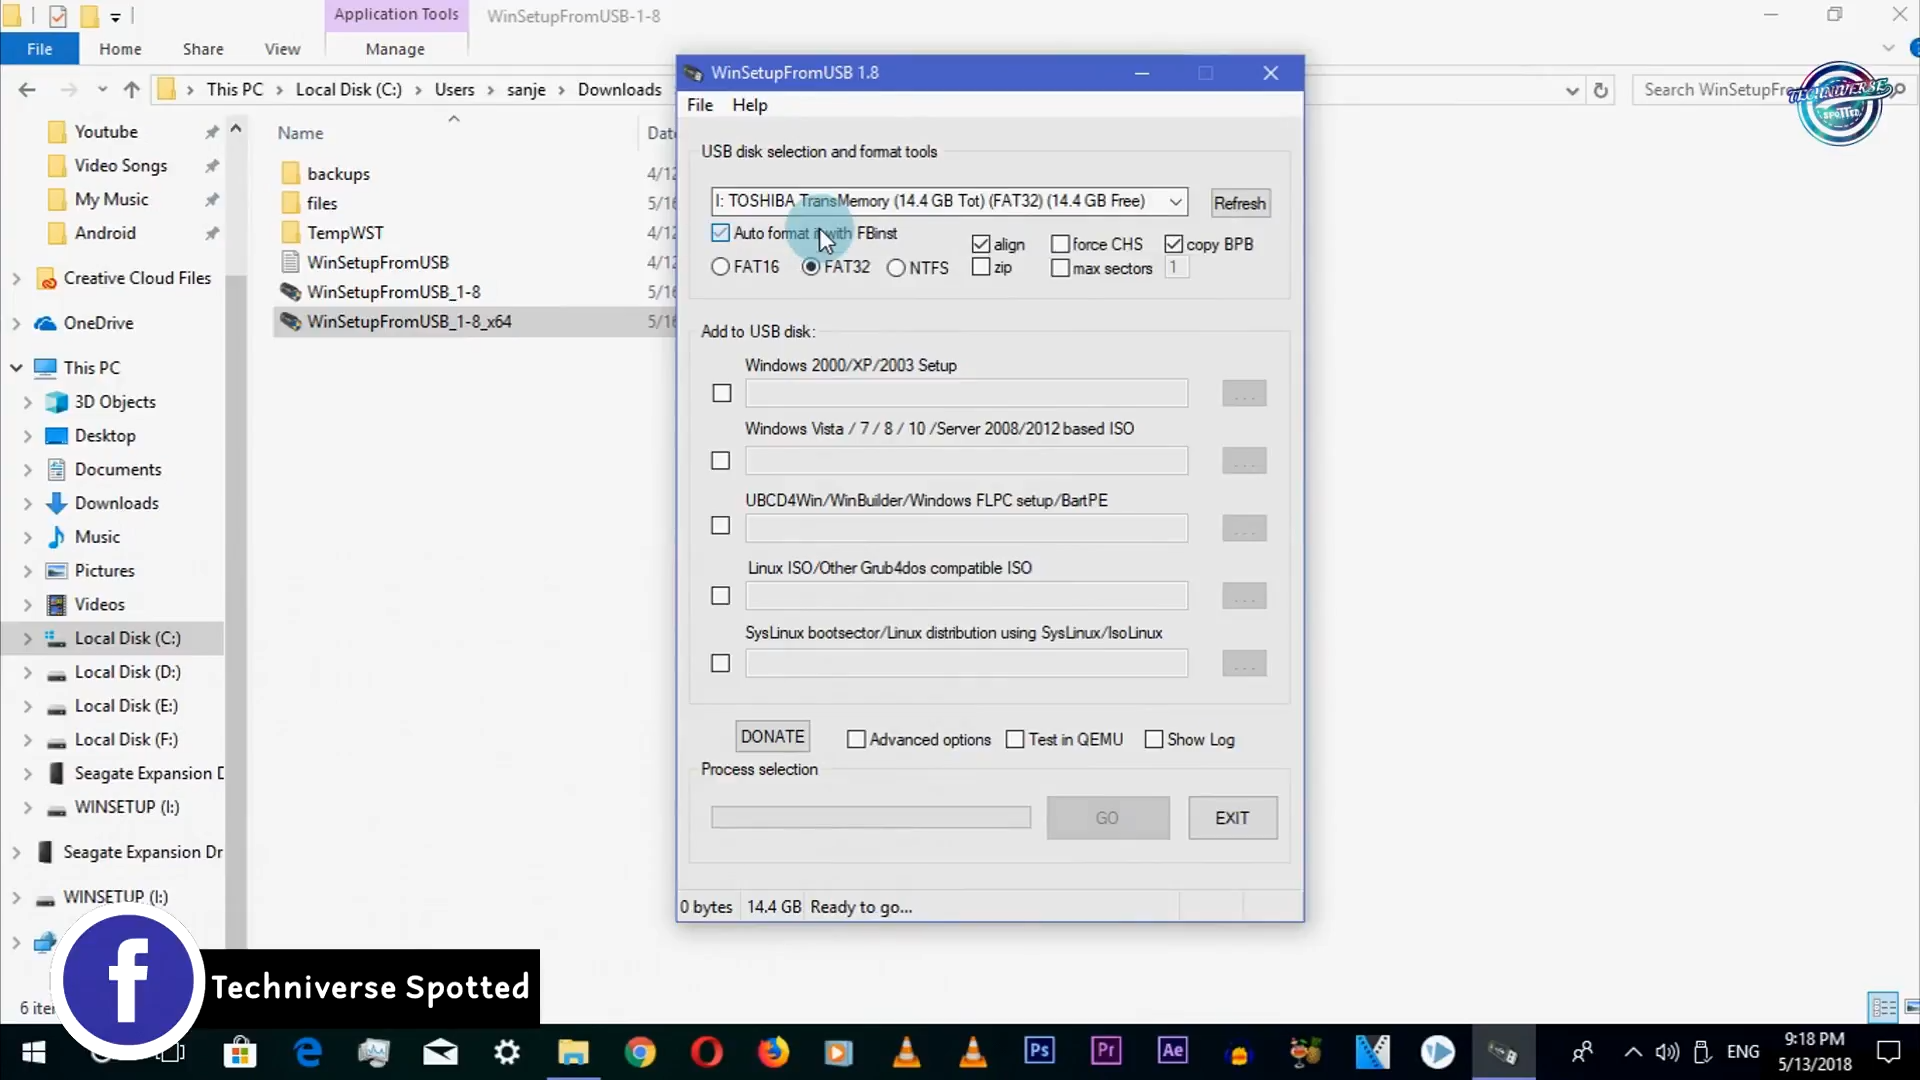
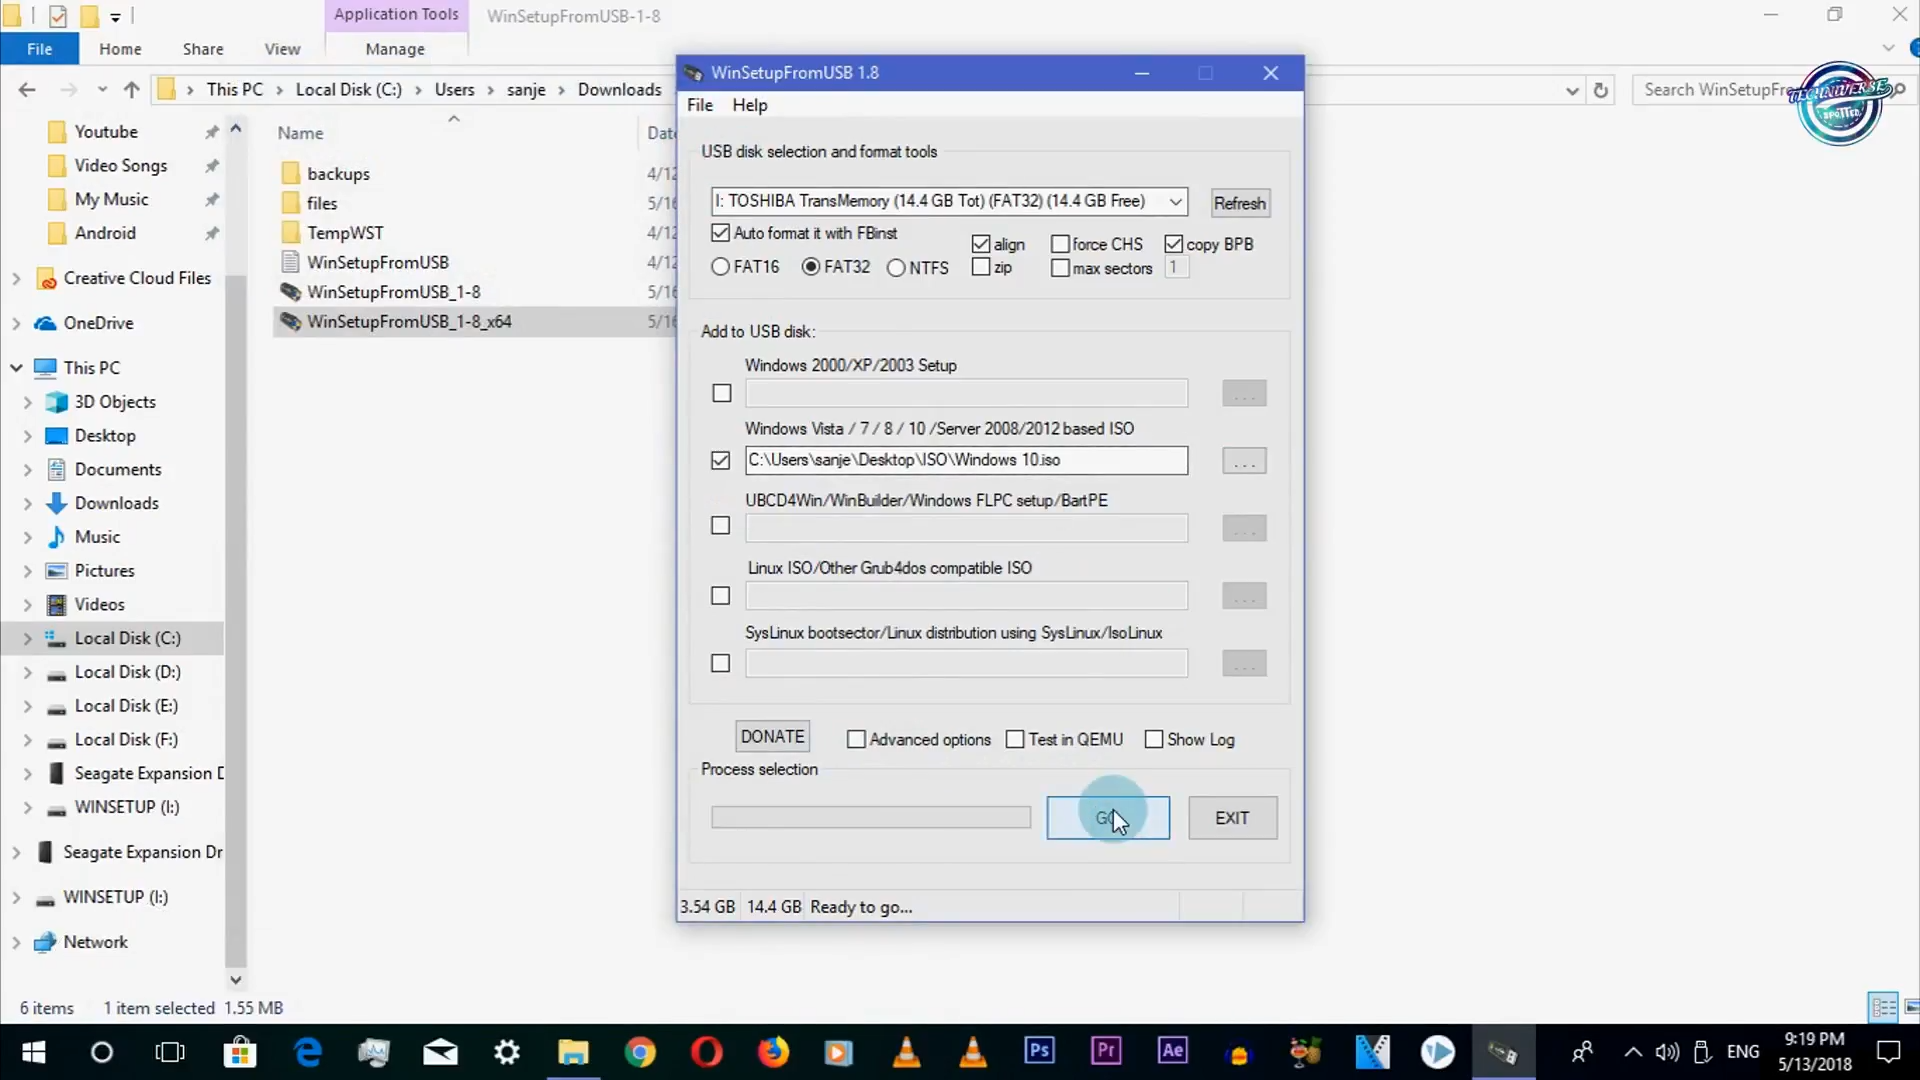
Make sure your flash drive is listed, click the refresh icon if the attached drive is not there in the list.
Tick 'Auto format it with FBinst'. Note that you have to click this option only for the first ISO installation.
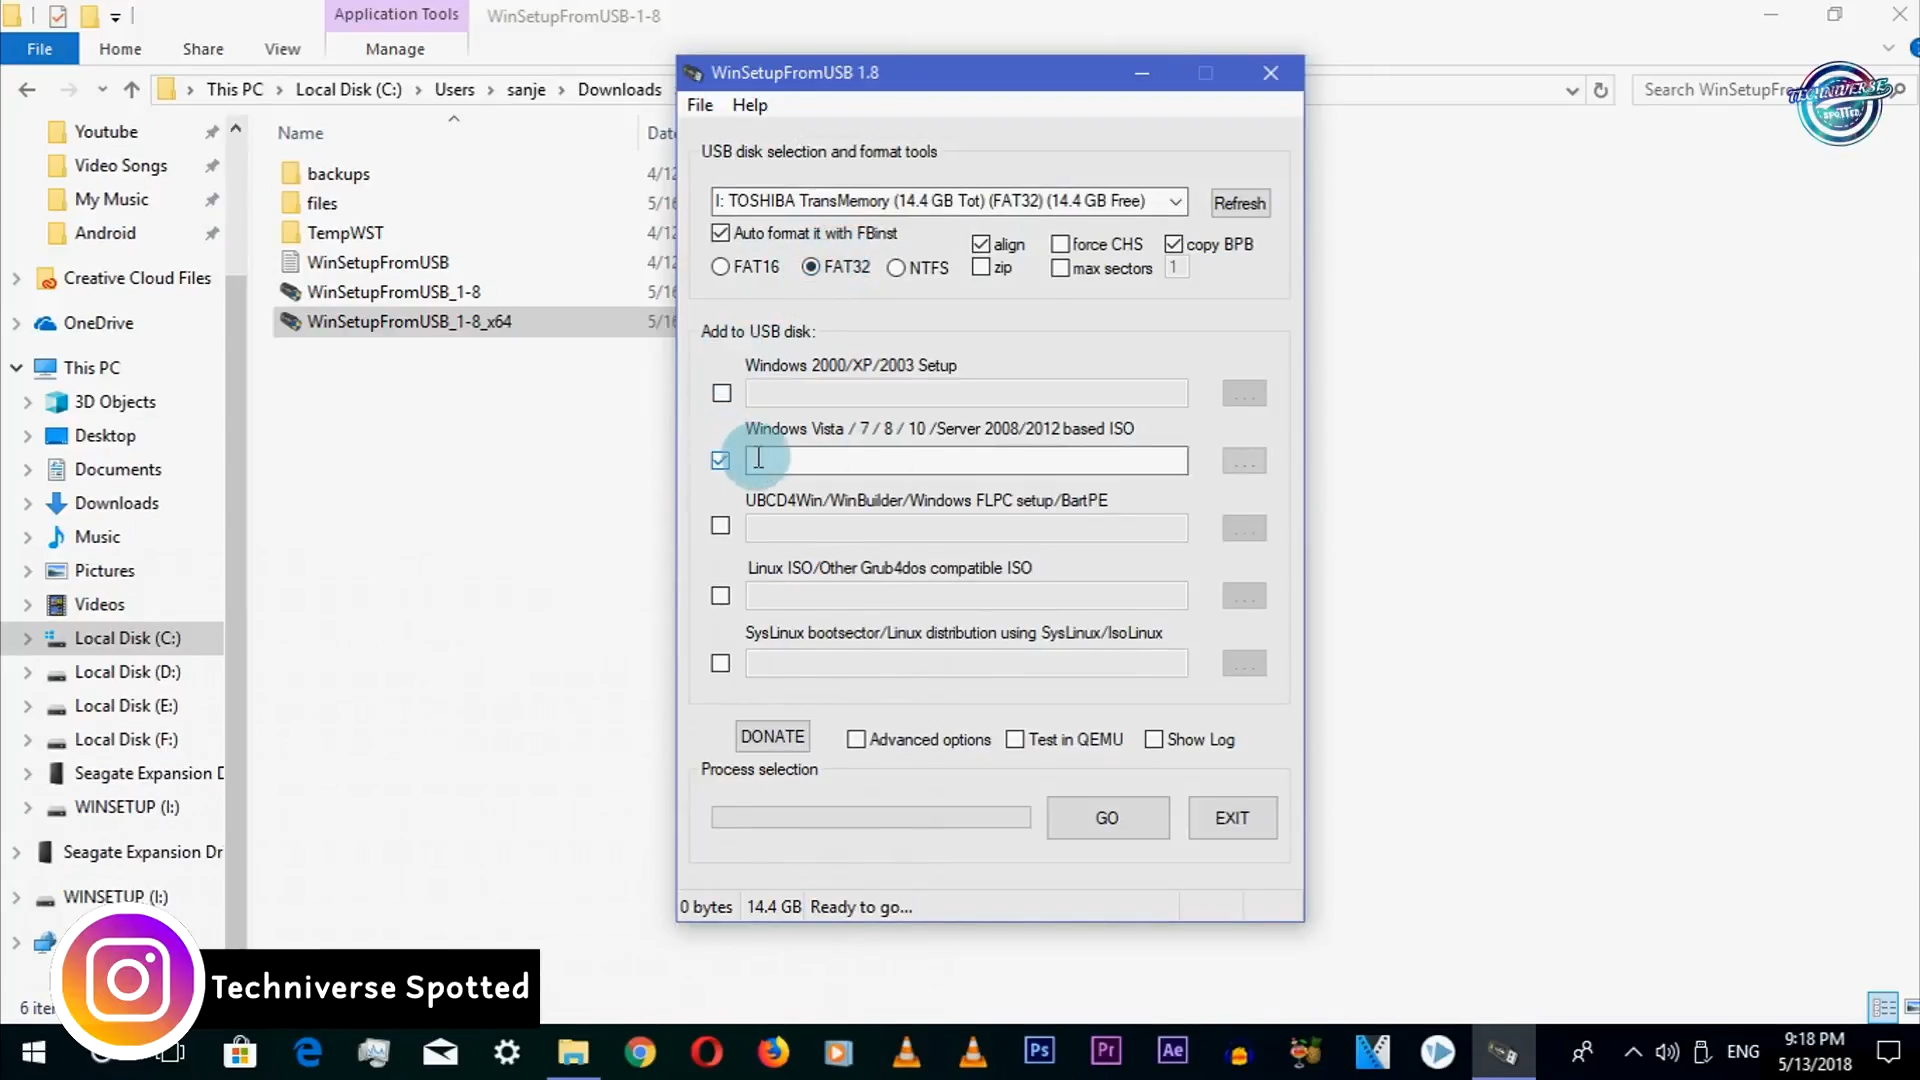
To add the .iso file to your USB Drive, tick the check box corresponding to OS under the 'Add to USB disk' sub-heading.
Here I am having a Windows 10 ISO, So, I'm ticking the option of Windows ISO.
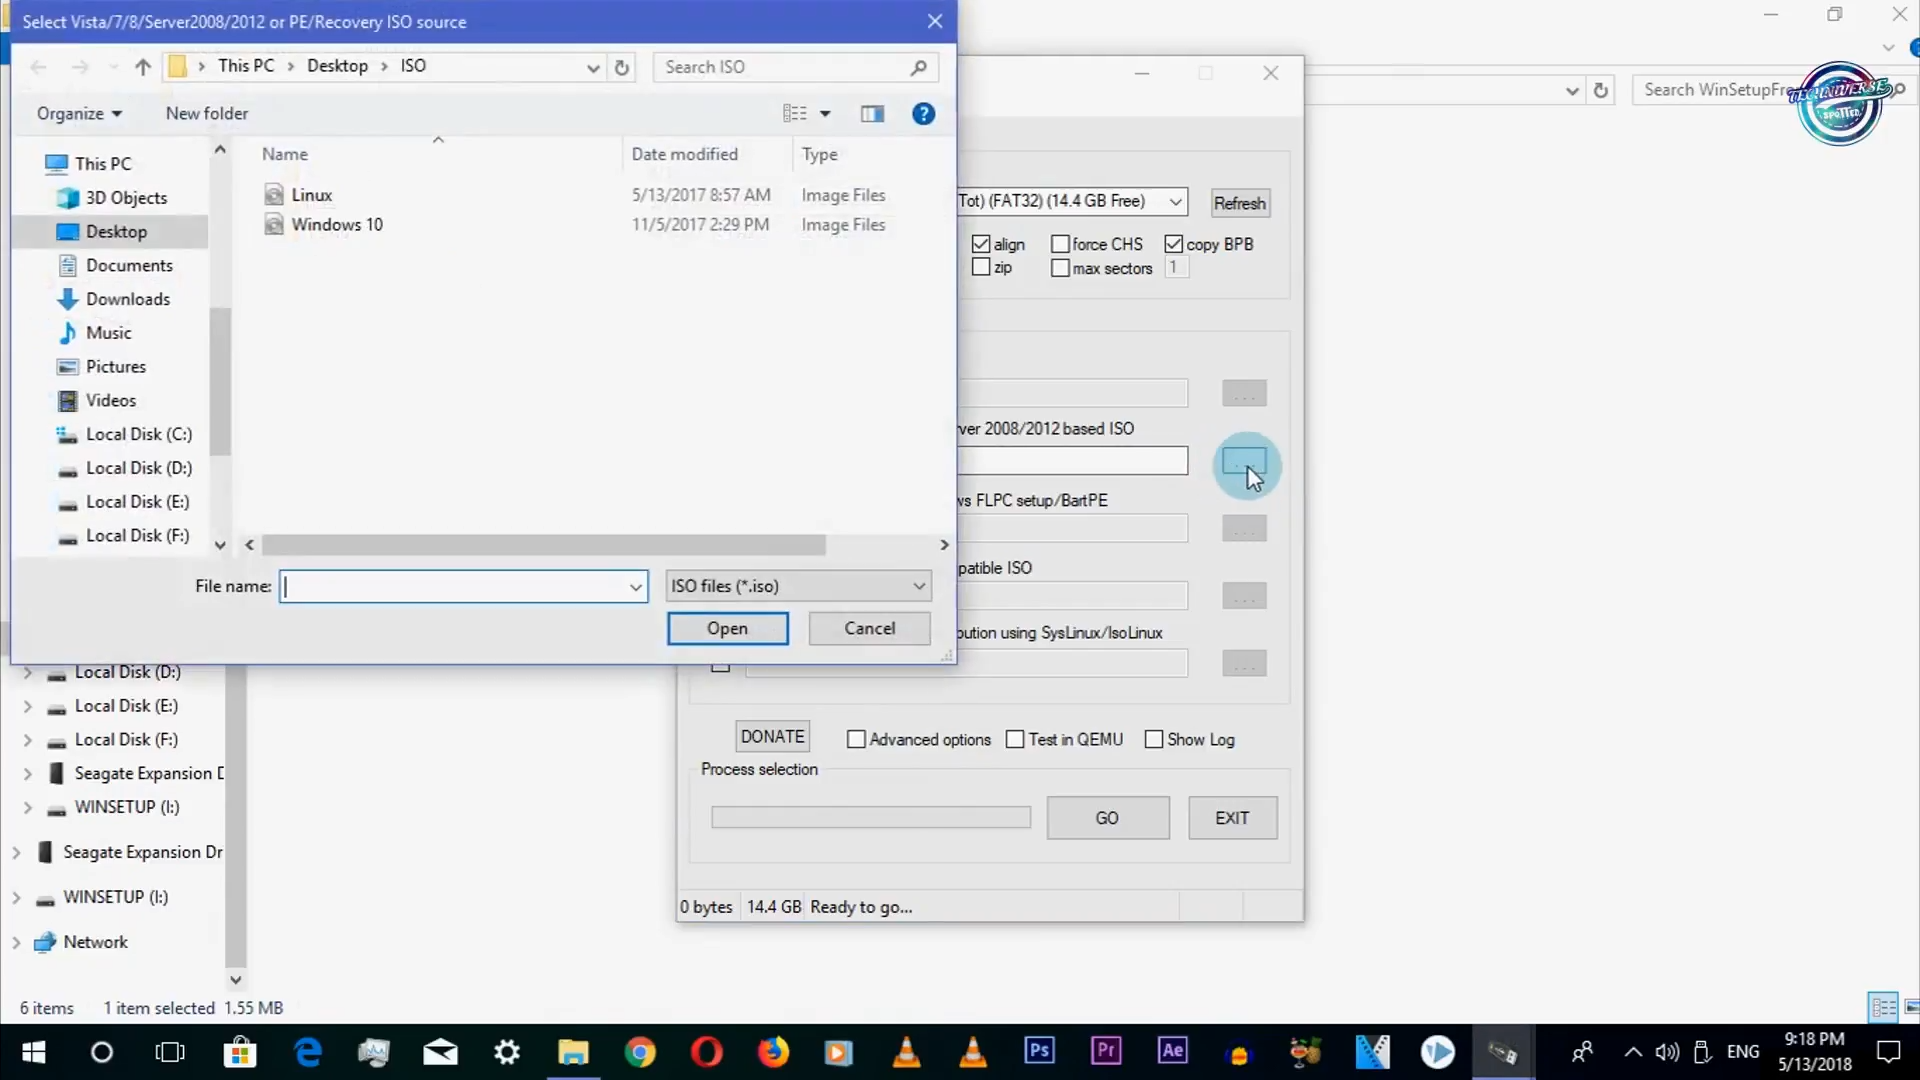
Now browse the first .iso file.
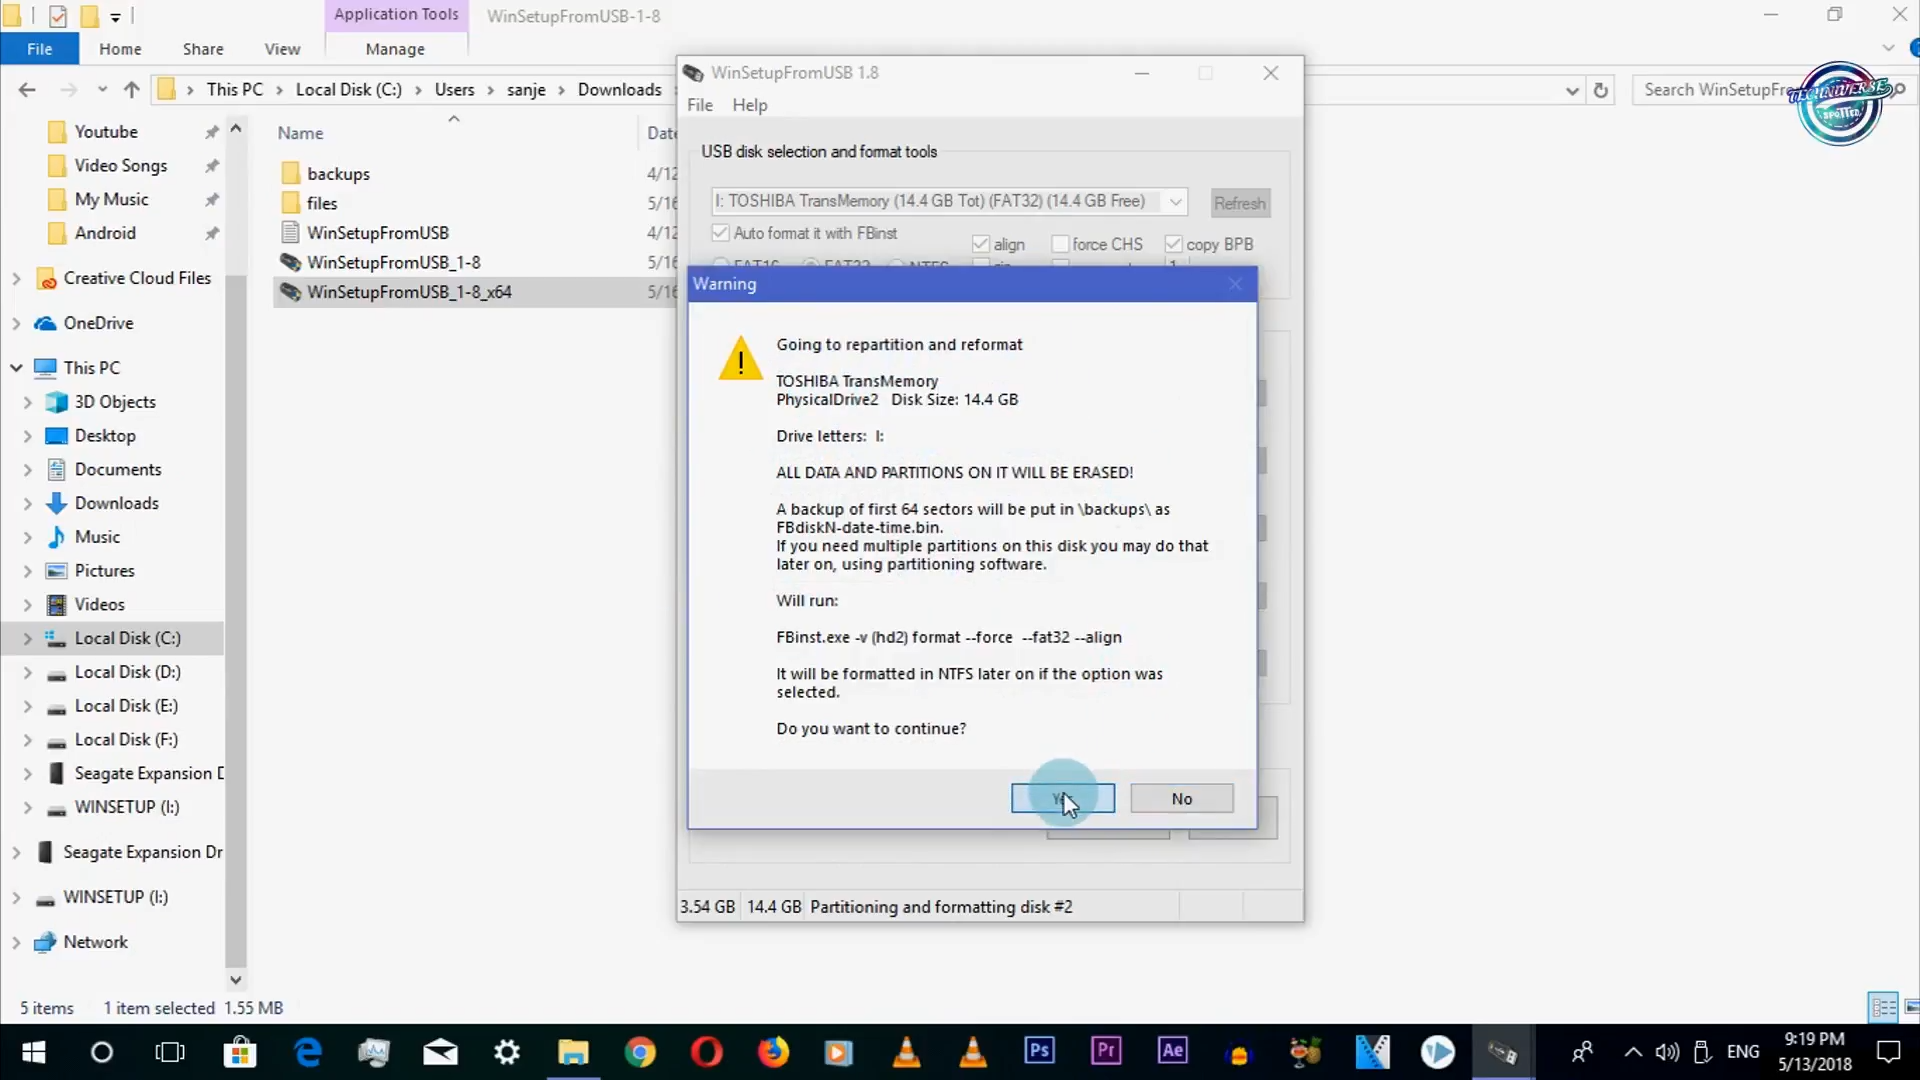
A data deletion warning message will be displayed. This is because you have chosen to format the flash drive, click on 'Yes'.
Do remember to check the flash drive name before clicking 'Yes', else you will end up formatting some other connected storage media.
Another warning message will be displayed, telling you that all the partitions will be erased. Click on 'Yes' again.
If the size of your ISO is larger than 4 GB, it will show a message to split the file into parts. This is because you have chosen the 'FAT32' option.
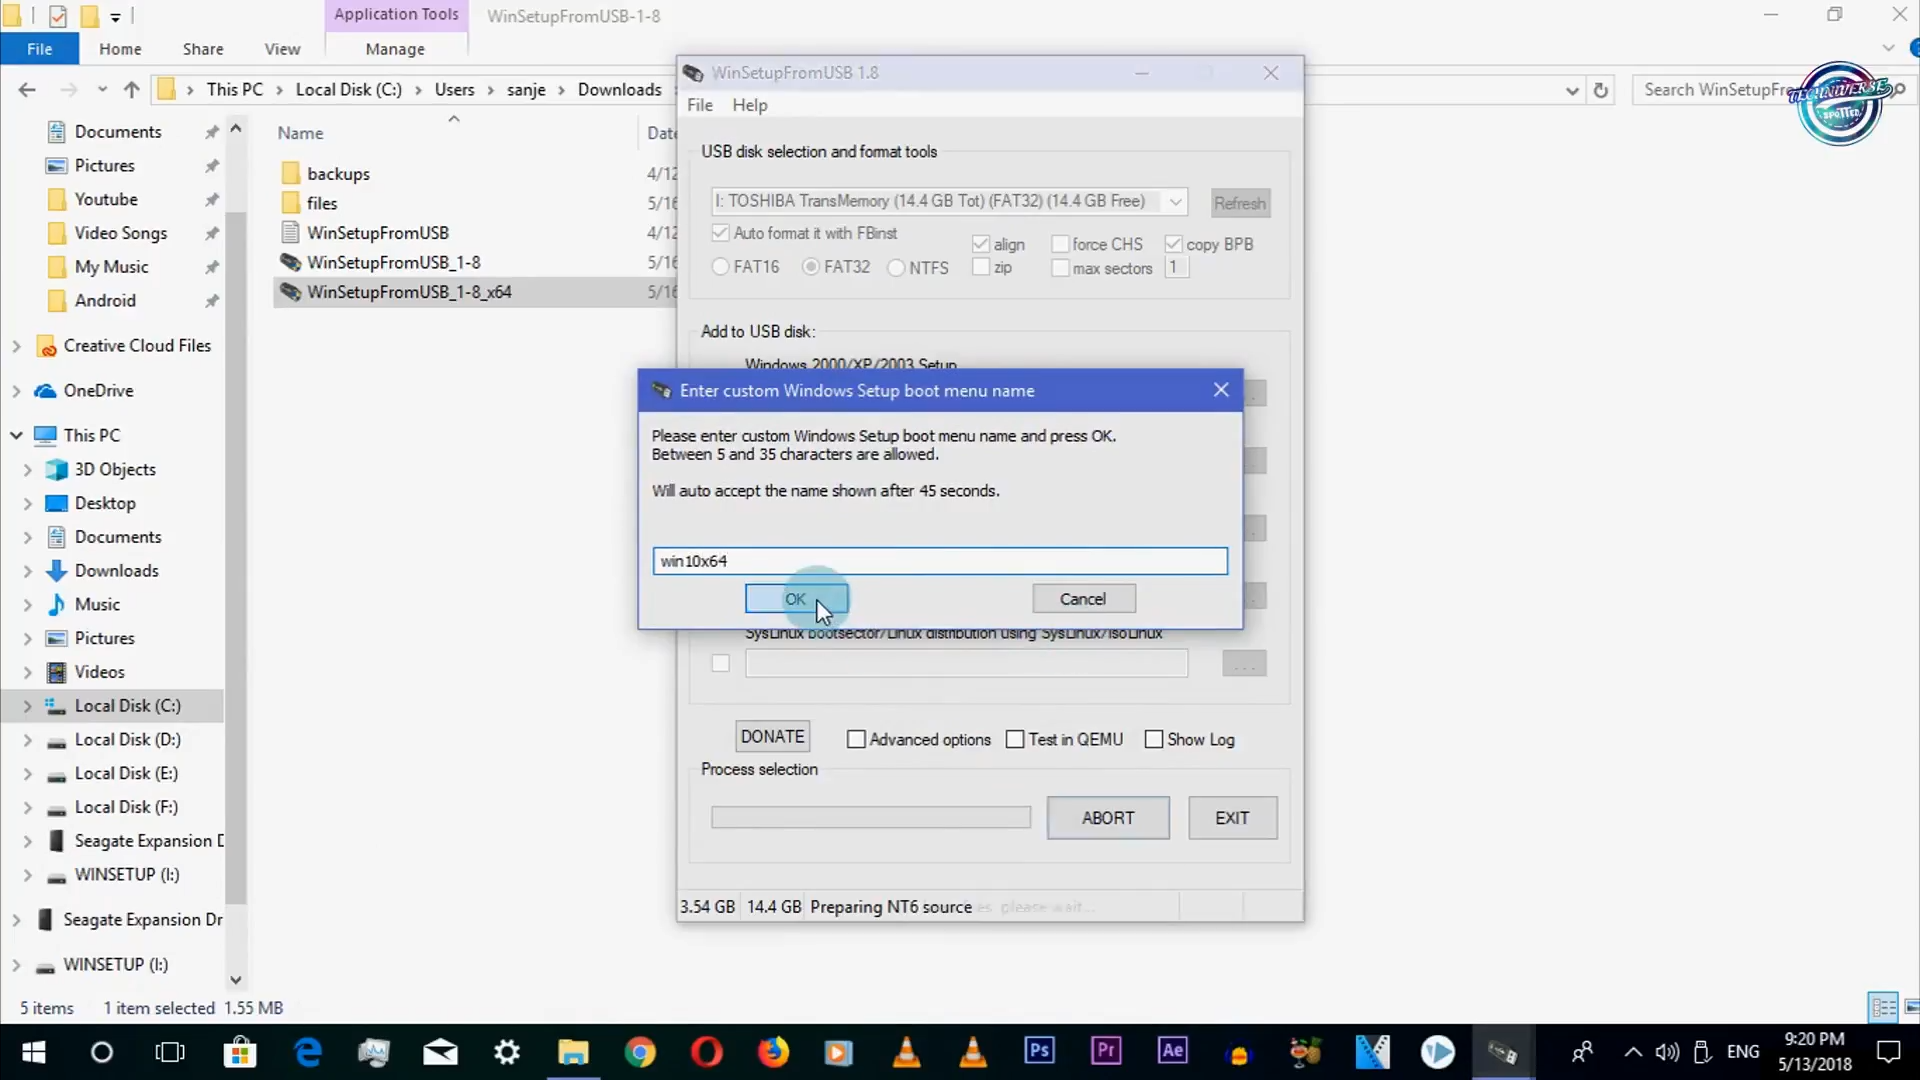
It will then ask for the boot menu name. This will appear when you run the Multiboot USB on some PC and choose an operating system. Type your desired name, like 'Windows 10 x64', and click 'Ok'.
The process will take a few minutes to finish. This software does not support dual ISO's. It can't have 32-bit and 64-bit versions in a single ISO. It will then show an error message if you try to do that.
Now for the second .iso file, I am having a Linux ISO as a second boot image. So, I'm ticking the option of Linux ISO.
Now browse the second .iso file for your Multiboot USB and click 'Go'.
I hope this simple guide would surely help you if you want to easily create a Multiboot USB Drive on your Windows PC.
Creating a bootable USB drive comes in handy when we had to reinstall our operating system, in case of system failures. It's effortless to put .iso files on portable Pendrives.
Let's just keep all the things aside and Let the tech begin!
Prerequisites
The required items to create a Multiboot USB Drive are,
- A Pendrive with at least 16 GB storage (or as to the number of .iso files to be added).
- The iso file(s) of the OS.
- A Bootable Pendrive creator, which in this case is WinSetupFromUSB.
Creating a Bootable USB
Once you download the WinSetupFromUSB setup from the above link, you need to connect the flash drive to your computer.
There is no need of installing the downloaded file, it will work without any installation. Double click on WinSetupFromUSB and open the 32-bit or 64-bit version, according to your operating system.
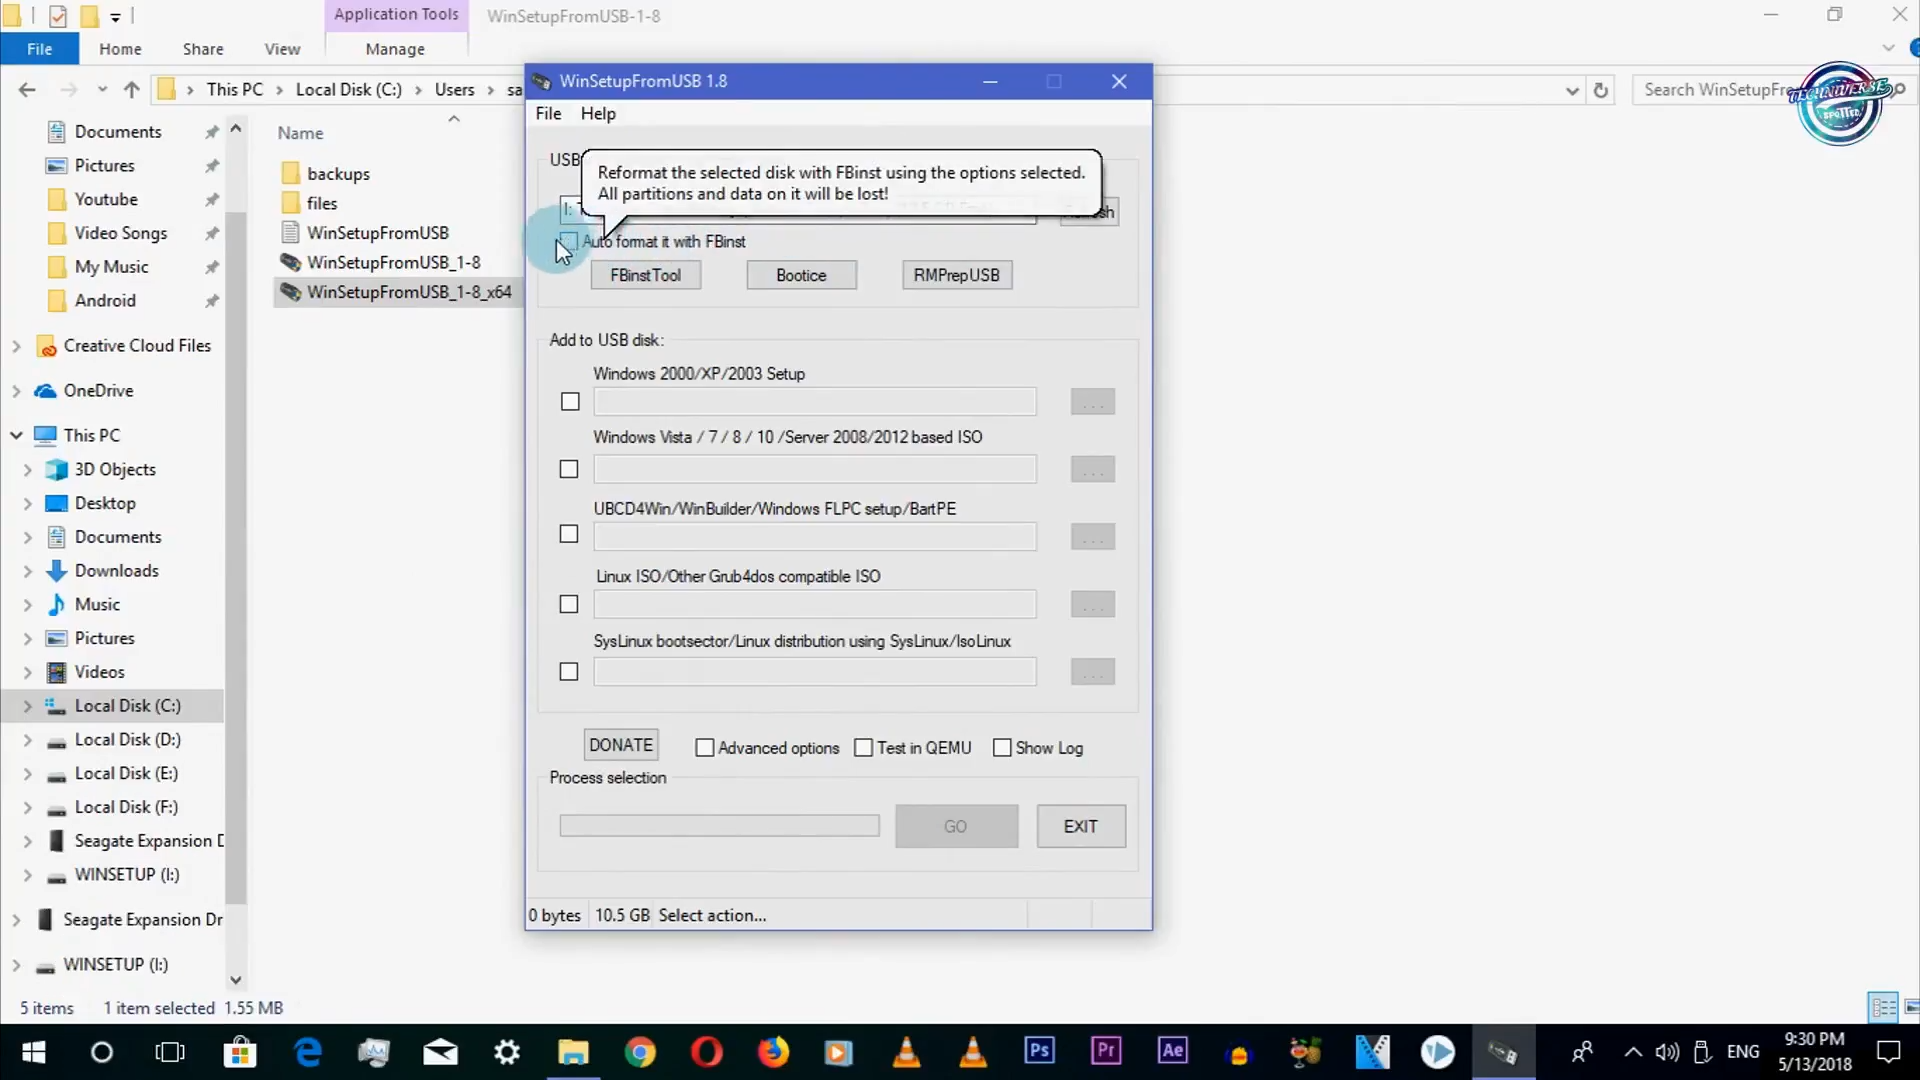
Make sure your flash drive is listed, click the refresh icon if the attached drive is not there in the list.
Tick 'Auto format it with FBinst'. Note that you have to click this option only for the first ISO installation.
To add the .iso file to your USB Drive, tick the check box corresponding to OS under the 'Add to USB disk' sub-heading.
Here I am having a Windows 10 ISO, So, I'm ticking the option of Windows ISO.
Now browse the first .iso file.
A data deletion warning message will be displayed. This is because you have chosen to format the flash drive, click on 'Yes'.
Do remember to check the flash drive name before clicking 'Yes', else you will end up formatting some other connected storage media.
Another warning message will be displayed, telling you that all the partitions will be erased. Click on 'Yes' again.
If the size of your ISO is larger than 4 GB, it will show a message to split the file into parts. This is because you have chosen the 'FAT32' option.
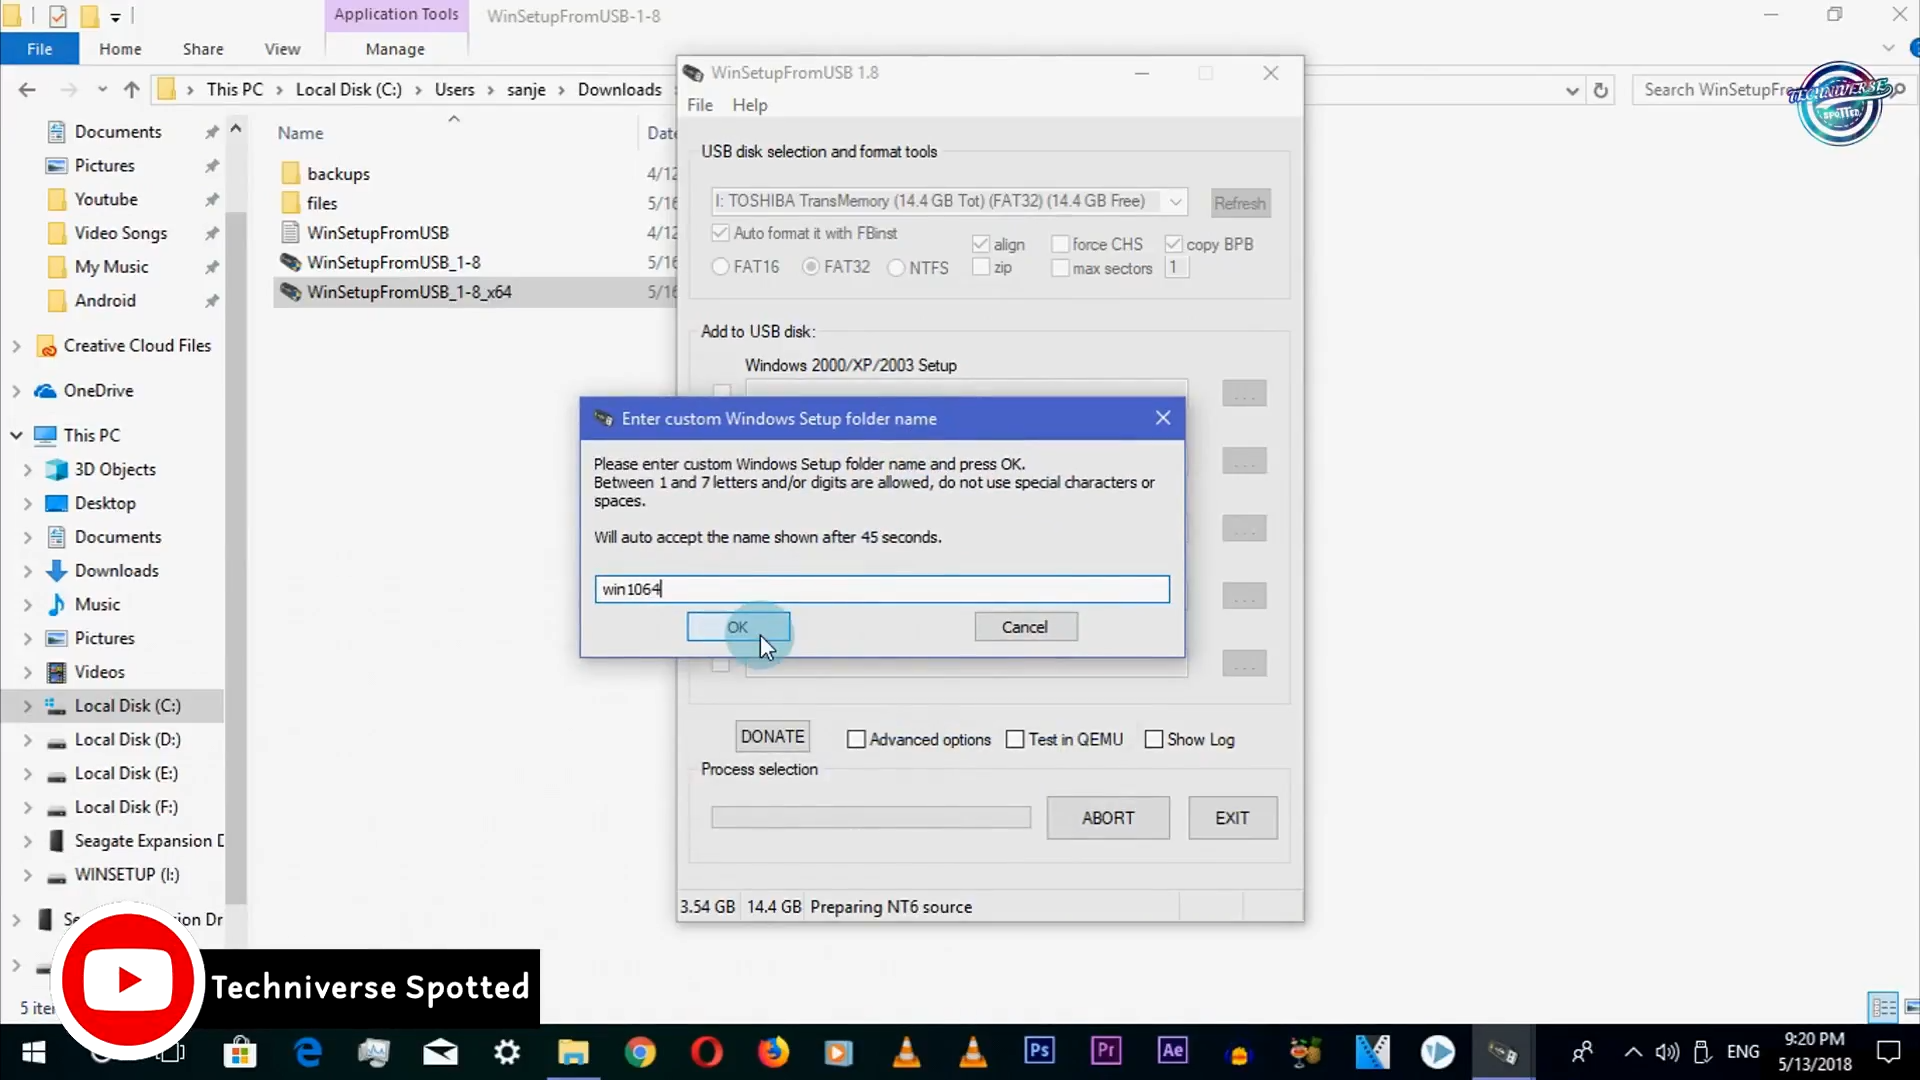
Next, it will ask for the folder name, type the desired one in 45 seconds, or it will be auto-selected. Then click on 'Ok'.
It will then ask for the boot menu name. This will appear when you run the Multiboot USB on some PC and choose an operating system. Type your desired name, like 'Windows 10 x64', and click 'Ok'.
The process will take a few minutes to finish. This software does not support dual ISO's. It can't have 32-bit and 64-bit versions in a single ISO. It will then show an error message if you try to do that.
Once the process is completed, you will be shown a dialog box, mentioning 'Job done', click 'Ok' to finish.
Adding Multiple ISOs
Now the main question is 'How to add the second .iso file in the same USB disk?'.
Start the tool again. Select your flash drive in the drop-down menu. This time don't click on the 'Auto format it with FBinst' option as it would remove your previous .iso file.
Now for the second .iso file, I am having a Linux ISO as a second boot image. So, I'm ticking the option of Linux ISO.
Now browse the second .iso file for your Multiboot USB and click 'Go'.
And repeat the steps mentioned earlier to add the second .iso file into the USB Drive. Follow the same process to add more .iso files.
How to Install OS
To install the operating system, Keep your Pendrive plugged in and shut down your PC. Now, turn on your PC and get into the BIOS settings of your device.
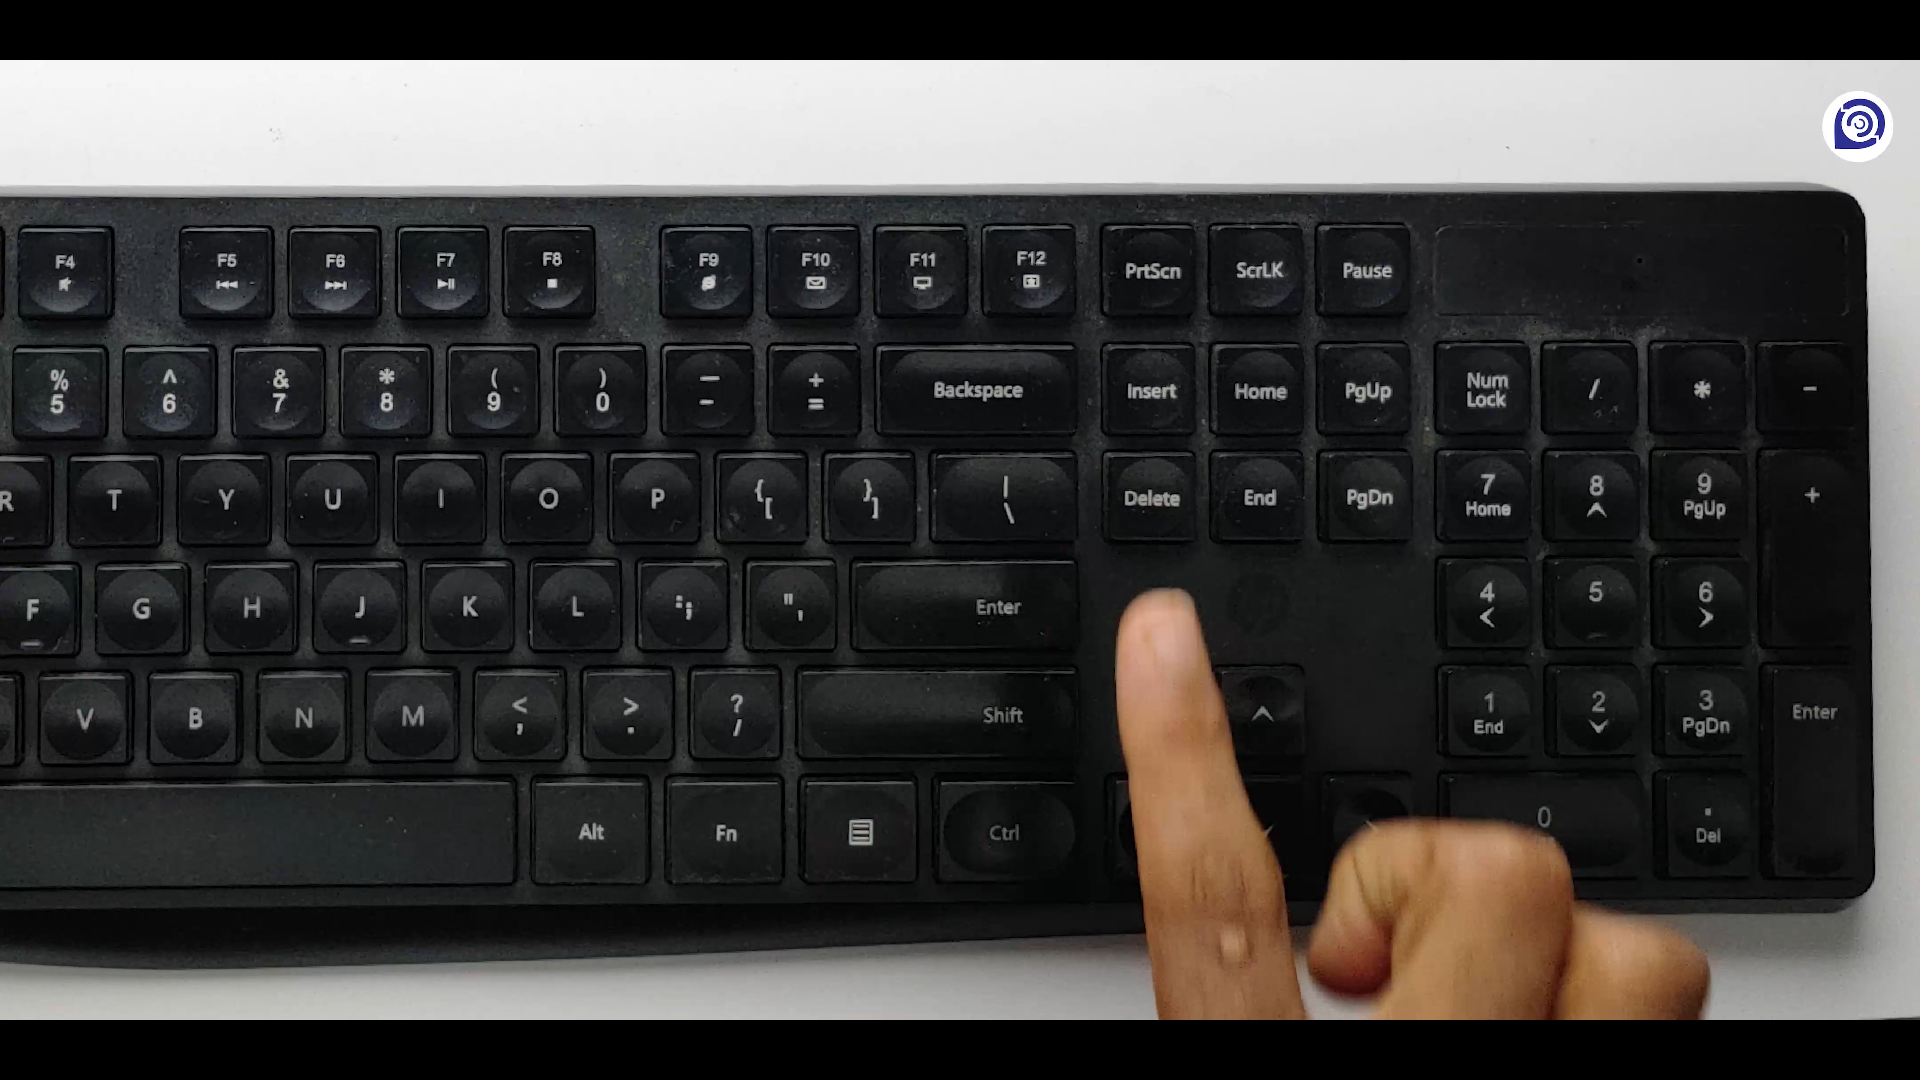
Here, every PC has a somewhat different method to get into BIOS settings. Some PCs get into BIOS settings by F12, for some it is F2. In my case, hitting the DEL button made the work. If you don’t know the BIOS key for your PC, try hitting each one of them or google the same.
Now, you have to enable the ‘USB Boot’ option in the BIOS settings if disabled and prioritize your Pendrive over other devices available. To do that, get into the ‘Boot’ menu and find where you can set the device priority for booting.
As I said earlier, all the BIOS are different depending on the motherboard manufacturer. Some devices directly have ‘Boot Manager’ or ‘Boot Menu Property’ to change the first boot device.
After finding the same, set your Pendrive to be the first boot priority over the other devices available.
As mentioned before, we have to control and save the changes via the keyboard with the help of on-screen instructions. Once done, save the changes and restart your PC.
Here, every PC has a somewhat different method to get into BIOS settings. Some PCs get into BIOS settings by F12, for some it is F2. In my case, hitting the DEL button made the work. If you don’t know the BIOS key for your PC, try hitting each one of them or google the same.
Once you get into the BIOS, you have to know that most of the time mouse controls won’t work in BIOS, you have to use the keyboard instead. Follow the on-screen instructions to control and change the settings.
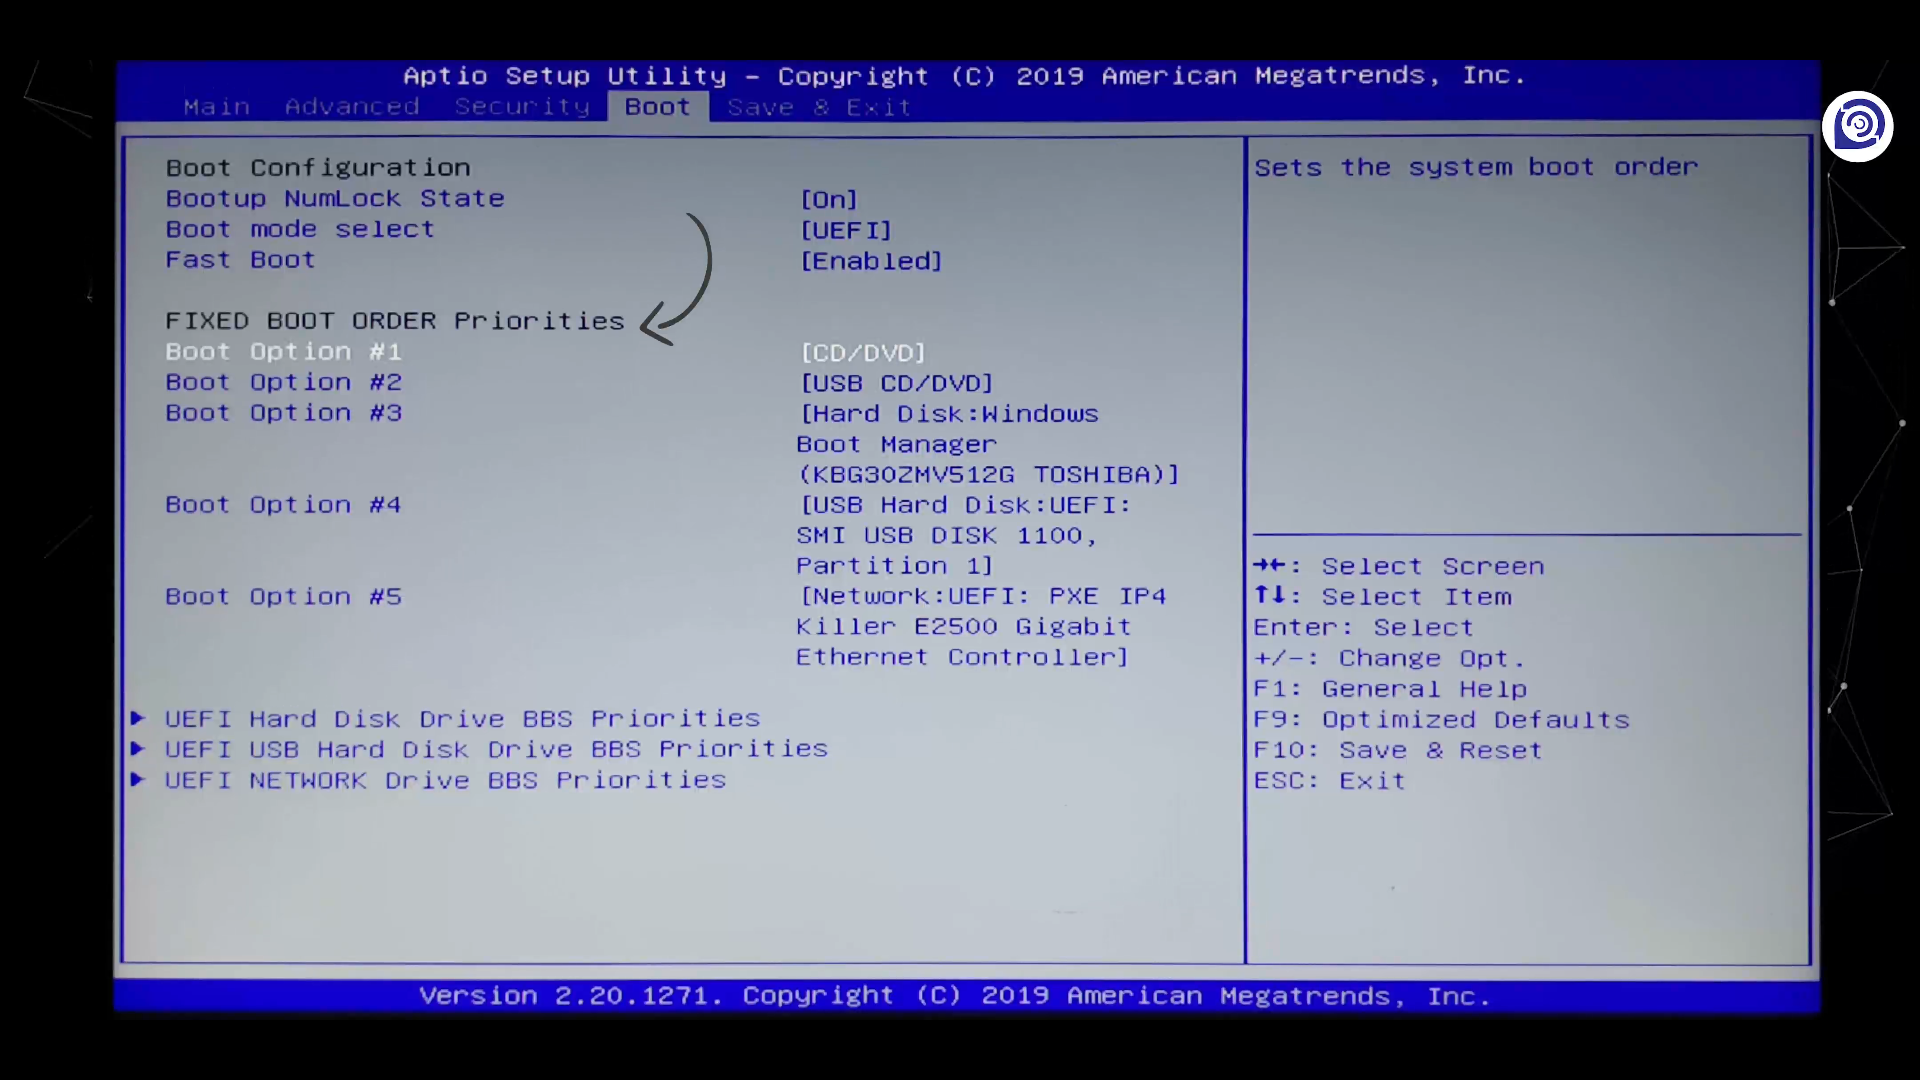
Now, you have to enable the ‘USB Boot’ option in the BIOS settings if disabled and prioritize your Pendrive over other devices available. To do that, get into the ‘Boot’ menu and find where you can set the device priority for booting.
As I said earlier, all the BIOS are different depending on the motherboard manufacturer. Some devices directly have ‘Boot Manager’ or ‘Boot Menu Property’ to change the first boot device.
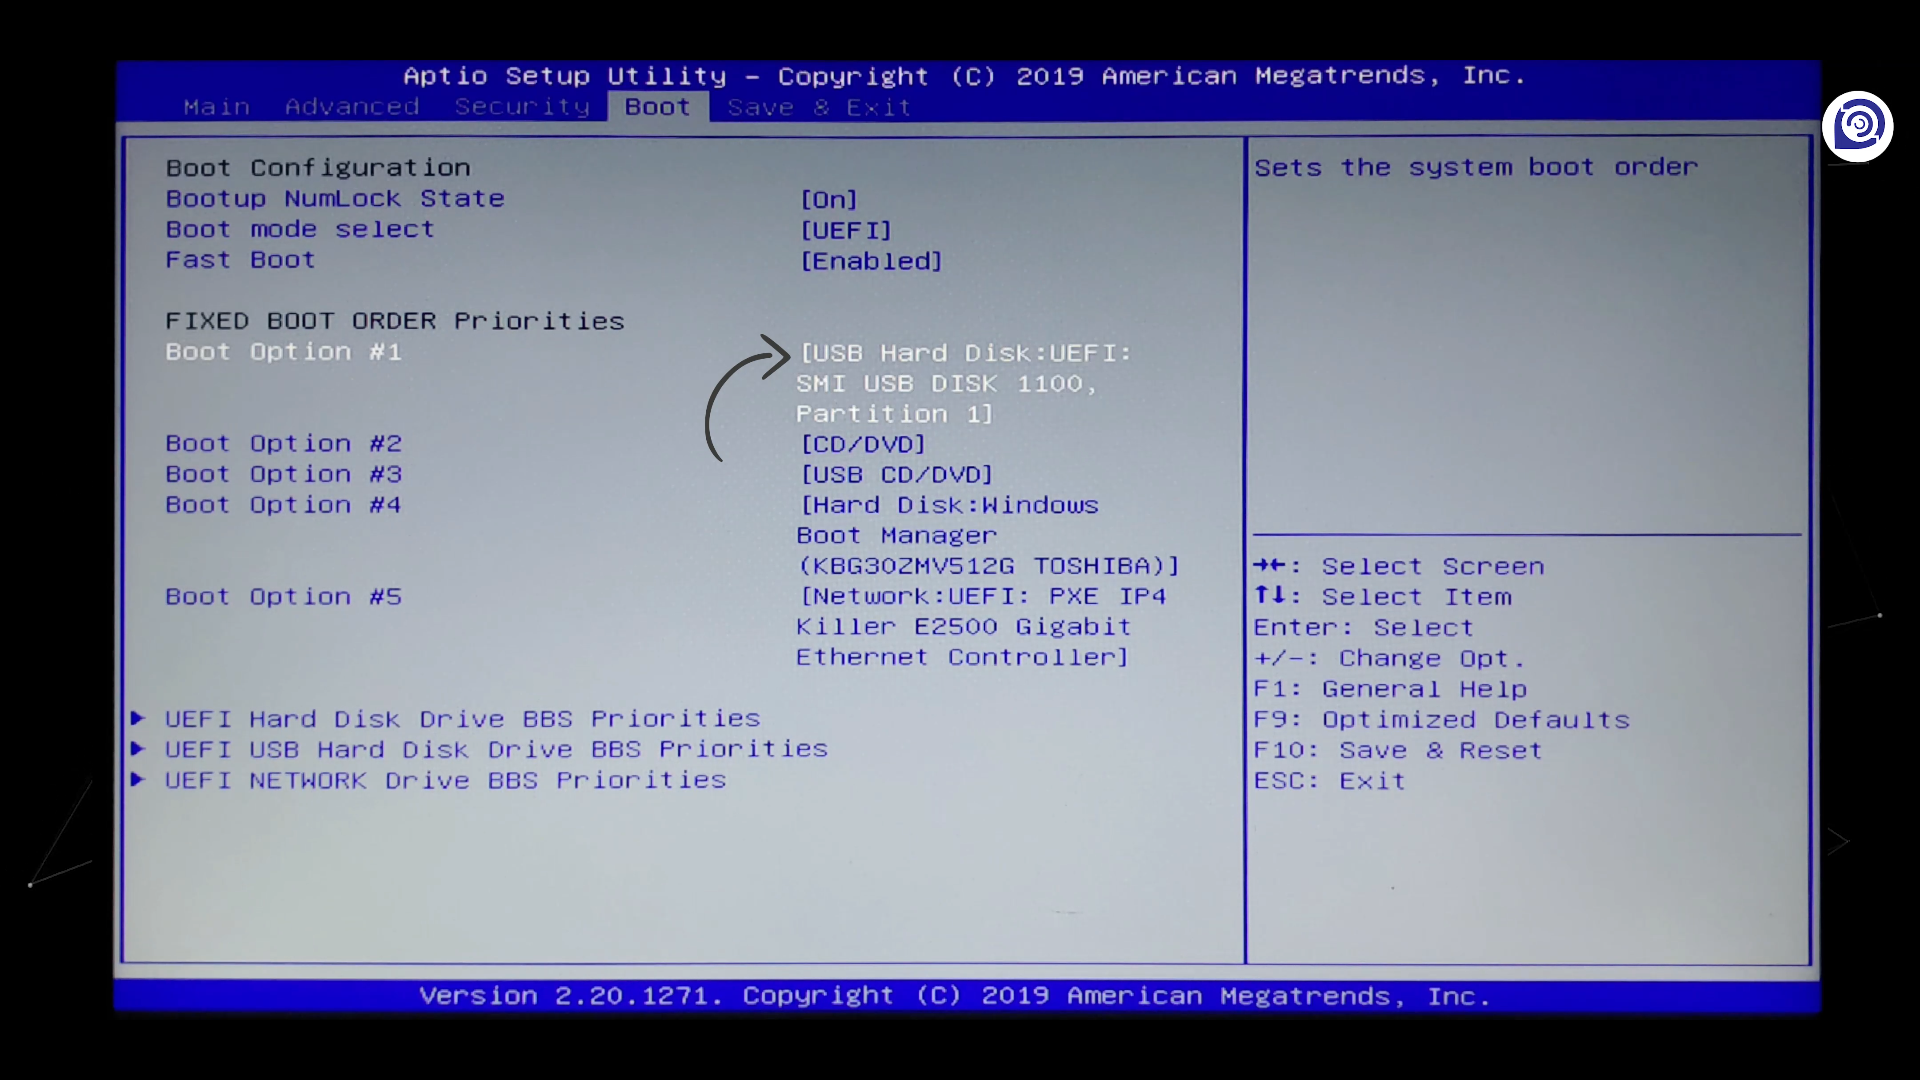
After finding the same, set your Pendrive to be the first boot priority over the other devices available.
In my MSI laptop, I have the Boot Order Priorities right in the ‘Boot Menu’. Now we have to change the 1st Boot option to be the Bootable Pendrive we created earlier.
As mentioned before, we have to control and save the changes via the keyboard with the help of on-screen instructions. Once done, save the changes and restart your PC.
And that's it. Done.
Reuse Bootable USB as Normal Pendrive
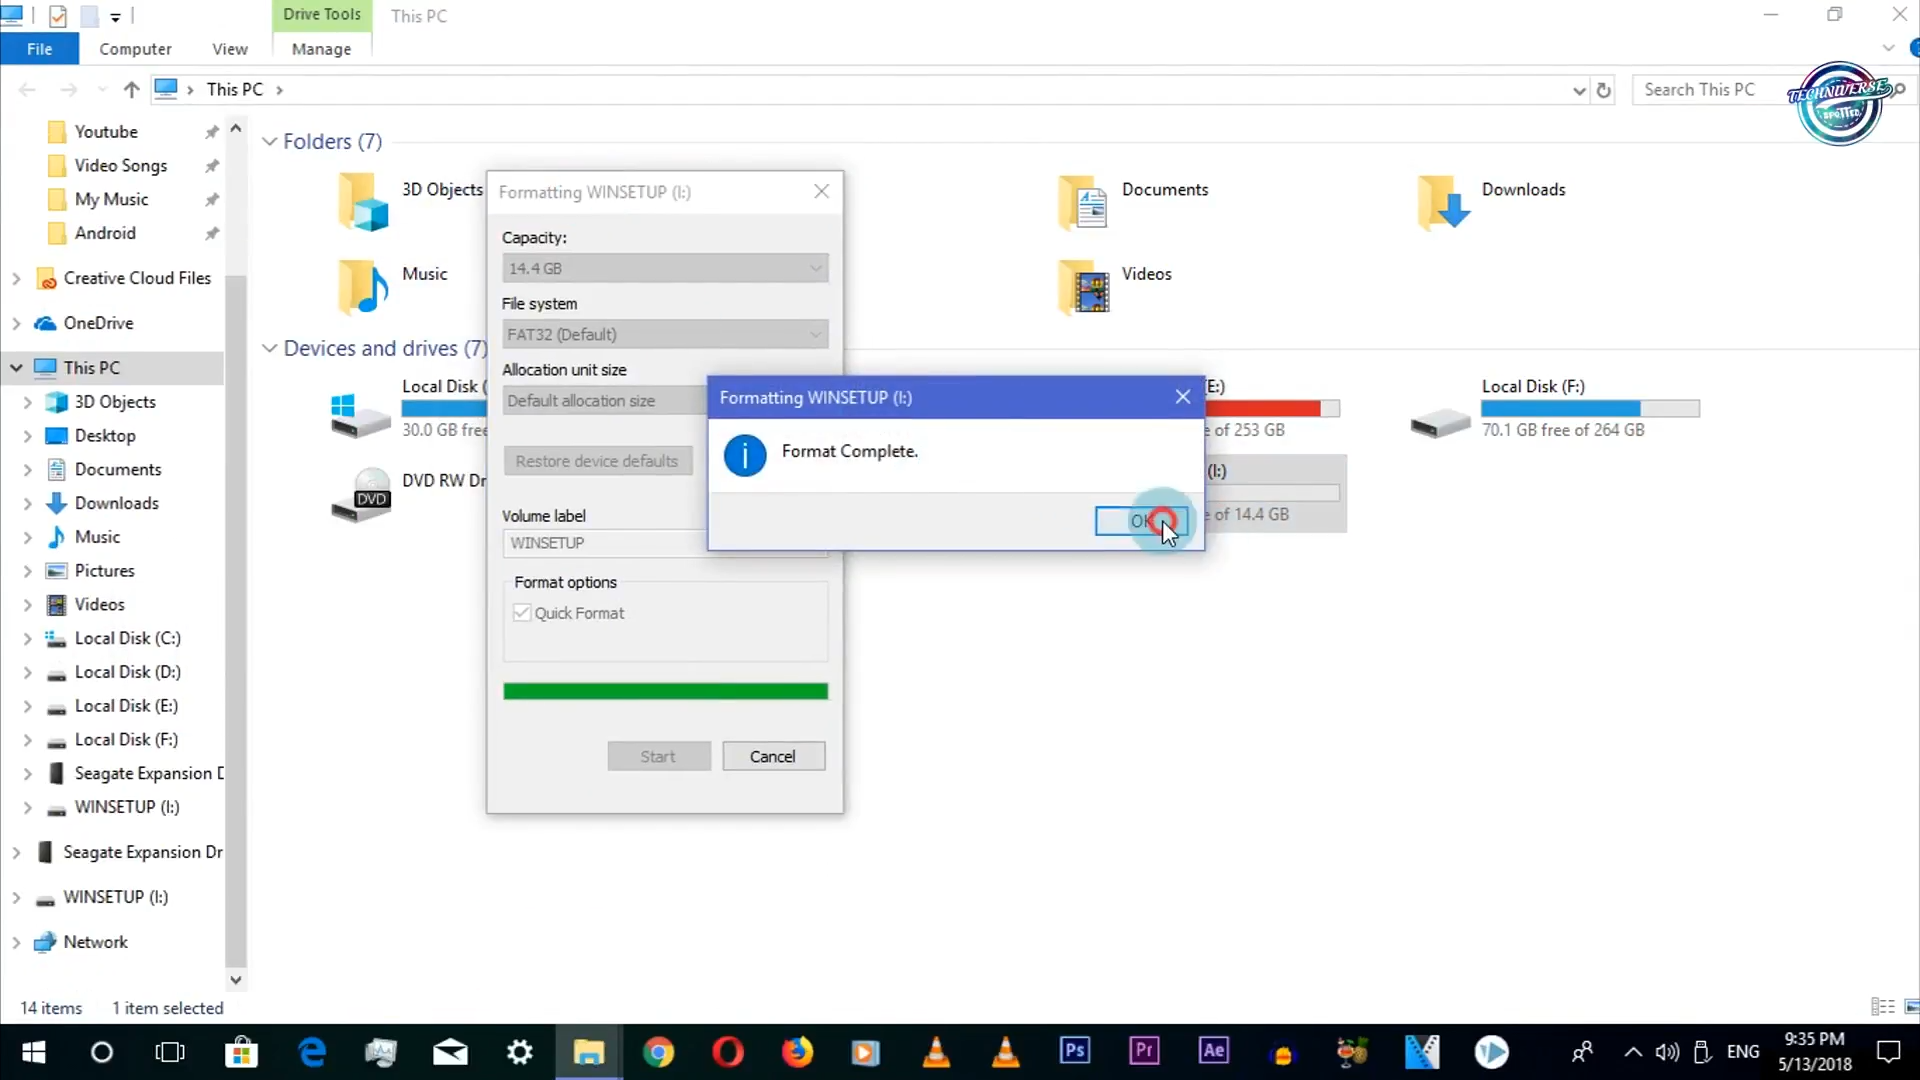
If you wanna reuse your bootable flash drive, like a normal Pendrive, what you have to do is to format your flash drive by loading the device defaults.
I hope this simple guide would surely help you if you want to easily create a Multiboot USB Drive on your Windows PC.
Here is the video version of the same above-mentioned guide on our own YouTube channel. Do watch it to get an easy understanding of the same.
Conclusion
Overall, that was how you can create a Multiboot USB Drive right on your PC in the simplest way possible.
So, That was all about creating a Multiboot USB Pendrive. Keep supporting Techniverse Spotted for more cool and interesting stuff.












Post a Comment